This page covers settings specific to the two text-based block types, Textline (single-line) and Multiline (multi-line). It is part of the PDFlib template preparation guide. See also: Getting Started with PDFlib Blocks | PDFlib Image Blocks
¶ Detect Underlying Font and Color
If the template you are preparing already contains text, it is helpful to enable the option to Detect Underlying Font and Color from the PDFlib Blocks menu. This option will almost always detect the font and color of the text you are creating a block for. Once this option is enabled, a check mark will appear next to it in the menu.
Note: If the fonts in your PDF are converted to outlines, this option will not detect the font used.

¶ Creating Single-Line Text Blocks
You should use Single-Line Text Blocks for single lines of text. Once you've defined the area to contain variable data, the PDFlib blocks dialog box opens. Make sure that the Block Type is set to Textline. Adjust the settings for the block and click Create.

| Rect | The four numbers contained here are the X and Y coordinates of the upper left and lower right corners of the block drawn. You can edit these coordinates to reflect the desired location of the block. |
| fontname | Name of the font to be used in the block. To edit, you can type the font name or choose from your system fonts by clicking on the ellipsis and choosing a font from the list. If you enabled Detect Underlying Font and Color, it should place the font name here. The font name used in this option must be exactly the same as the name you give the font in the Designer Admin. This field should not contain special characters such as periods. Hyphens are fine to use here. |
| fontsize | Size of the font to be used in the block. If you enabled Detect Underlying Font and Color, it should pick up the font size and place it here. |
| fontstyle | This field should always be set to normal. If you need bold text, you need to use the bold face font. |
| fillcolor | Color to be used for the font in the block. If you enabled Detect Underlying Font and Color, it should pick up the color and place it here. You can edit the color by clicking the ellipsis and choosing a different color from a color book or by inserting a CMYK build. You should use DeviceCMYK (for process color builds) or Separation (for spot colors), not DeviceRGB, DeviceGray, or LAB. |
| fitmethod | When set to Auto, this will proportionately shrink any text that is too long for the block. It will not let text that doesn't fit run out of the block, cut off text that doesn't fit in the block, or disproportionately modify the text. |
| position | Controls the horizontal and vertical alignment of single-line text blocks. To edit, click the ellipsis and select the desired horizontal and vertical alignment for your text. |
¶ Creating Multi-Line Text Blocks
You should use Multi-Line Text Blocks for multiple lines of text or for Single-Line Text Blocks that will have a Style assigned to them in the Designer Admin. Once you've defined the area to contain variable data, the PDFlib blocks dialog box opens. Make sure that the Block Type is set to Textflow. Adjust the settings for the block and click Create.

| Rect | The four numbers contained here are the X and Y coordinates of the upper left and lower right corners of the block drawn. You can edit these coordinates to reflect the desired location of the block. |
| fontname | Name of the font to be used in the block. To edit, you can type the font name or choose from your system fonts by clicking on the ellipsis and choosing a font from the list. If you enabled Detect Underlying Font and Color, it should place the font name here. The font name used in this option must be exactly the same as the name you give the font in the Designer Admin. This field should not contain special characters such as periods. Hyphens are fine to use here. |
| fontsize | Size of the font to be used in the block. If you enabled Detect Underlying Font and Color, it should pick up the font size and place it here. |
| fontstyle | This field should always be set to normal. If you need bold text, you need to use the bold face font. |
| fillcolor | Color to be used for the font in the block. If you enabled Detect Underlying Font and Color, it should pick up the color and place it here. You can edit the color by clicking the ellipsis and choosing a different color from a color book or by inserting a CMYK build. |
| alignment | Controls the horizontal alignment of multi-line text blocks. Choose your selection from the dropdown. |
| leading | Controls the leading of multi-line text blocks. The number input here should be represented as a percentage, not in points. 110% is acceptable, 11pt is not. |
| fitmethod | When set to Auto, this will proportionately shrink any text that is too long for the block. It will not let text that doesn't fit run out of the block, cut off text that doesn't fit in the block, or disproportionately modify the text. |
| verticalalign | Controls the vertical alignment of multi-line text blocks. Choose your selection from the dropdown. |
¶ Editing Font Names
For single and multi-line text blocks, fonts will need to be assigned. If Detect Underlying Font and Color was enabled when the block was drawn, it may insert a font name automatically for you. To edit the font name, simply type the name of the desired font in the block, or click the ellipsis. All of your system fonts will appear. Choose the desired font from the list and click OK.
Note: The font name used in this option must be exactly the same as the name you give the font in the Designer Admin. This field should not contain special characters such as periods. Hyphens are fine to use here.

¶ Editing Fill Colors
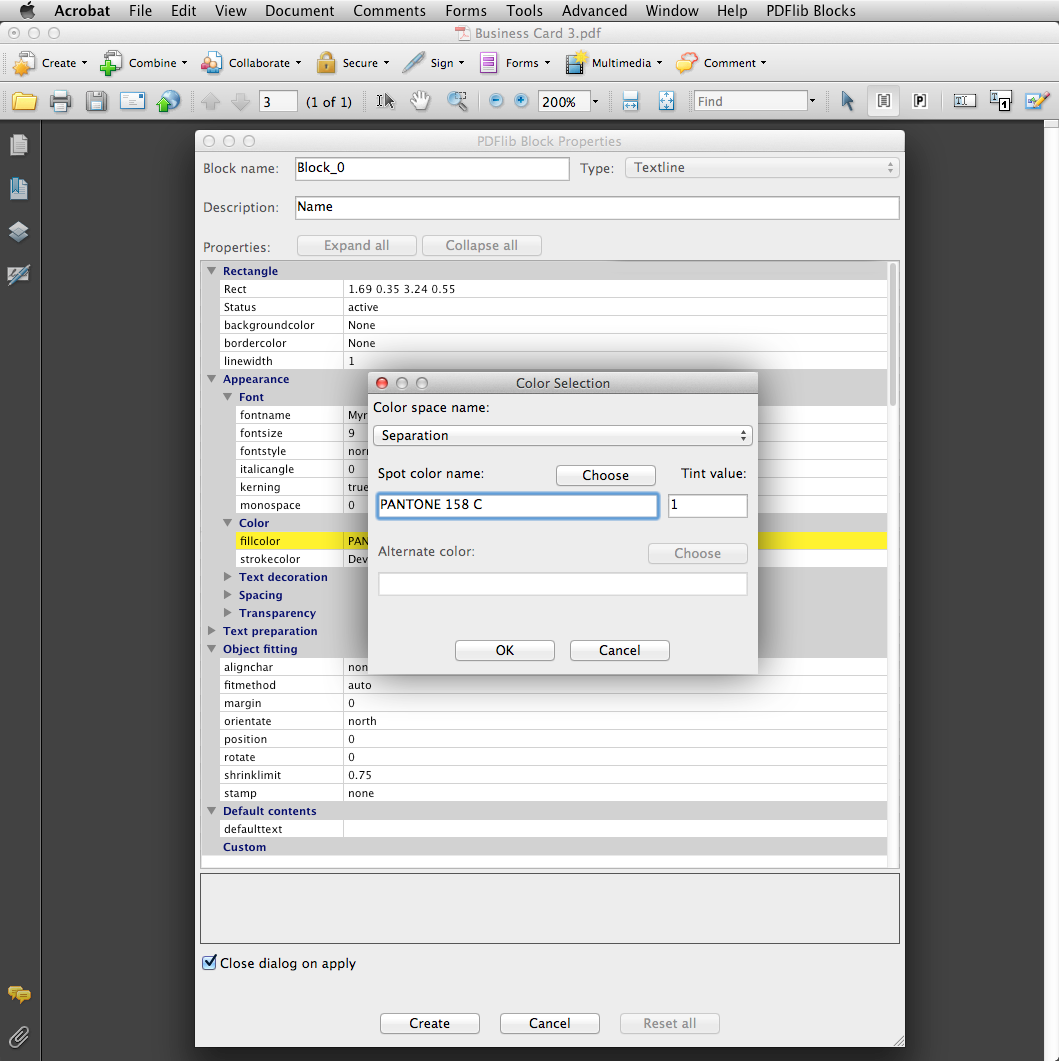
For single and multi-line text blocks, fill colors for the text will need to be assigned. If Detect Underlying Font and Color was enabled when the block was drawn, it may insert a color automatically for you. To edit fill color, click the ellipsis for the option. Set the desired color and click OK.
¶ Creating CMYK Builds
To create a CMYK color build, select DeviceCMYK from the Color Space Name dropdown. Define the Values for CMYK. The range for these values is between 0 and 1, not 0 and 100. Tints should be represented as decimal points. For example, if you want 50% cyan, it would be specifically represented as 0.50. 100% Black would be represented as 0 0 0 1 collectively.

¶ Choosing a Spot Color From a Color Book
To select a spot or Pantone color for the text, select Separation from the Color Space Name dropdown. Select Choose for Spot Color Name and open the desired color book (Pantone Solid Coated is most common). Select the specific Pantone color from the list and click OK. In the Tint Value, place 1 for 100%. Tints should be represented as decimal points. If you want 80% Pantone 155 C, it would be represented as 0.80 under Tint Value. Click OK to confirm.
