When Preflight Analysis finds certain problems in a PDF artwork file, wp2print can fix the file for you automatically. These automatic corrections are called file-fix functions. There are currently 2 file-fix functions:
- Upscaling low-resolution images: increases the resolution of low-resolution images inside the PDF
- Adding trim box and crop marks: adds a bleed, a correctly defined trim box and crop marks to pages that don't have them
A file-fix function never changes the customer's original file. It creates a new, fixed copy of the PDF. You can download and review the fixed file, then decide whether to use it in place of the original.
¶ What upscaling does
Upscaling increases the resolution of the low-resolution images in the PDF so that they print sharply. Everything else in the file, like text and vector graphics, is left unchanged.
The upscaler can return up to 2 fixed files: Upscaled RGB images only (PDF), which leaves CMYK images unchanged, and Upscaled RGB and CMYK images (PDF). Each has its own Replace original artwork file link, so you can choose the version you want.
Some images can't be upscaled. For example, an image may be too large for the upscaler or use an unsupported color format. These images are left as they are, and a message tells you how many images were skipped and why.
¶ What adding bleed & trim box does
This fix prepares each page for trimming after printing:
- Trim box: the page's original content is kept at its original size, exactly as it was, and is defined as the trim box. Nothing in the original page is scaled or cut off.
- Bleed: a 0.25 inch bleed is added around each page. The bleed is filled with a mirror reflection of the content near each edge, so that images and backgrounds that touch the edge of the page extend past the trim line.
- Crop marks: a 1 inch margin is added around the trim box, and crop marks are drawn in it at each corner.
The fixed file has the same name as the original, with _cropbox added at the end.
File-fix functions are part of Preflight Analysis. They can only be used after you have configured the file upload target to be AWS S3.
¶ Step 1: Analyze the file
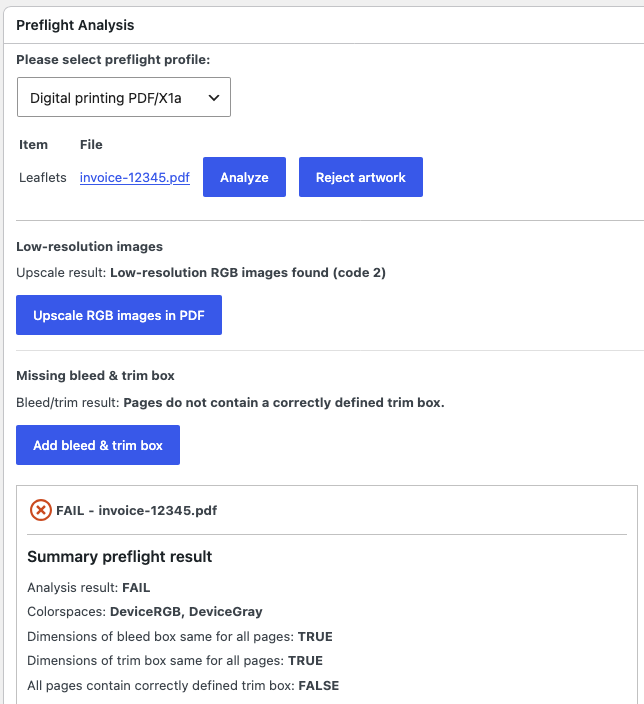
On the order detail page, click Analyze next to the artwork file. When the analysis is complete, a section is displayed above the preflight results for each problem that can be fixed automatically. Each section has a button that starts the fix.
In the example below, the analysis found both low-resolution RGB images and pages without a correctly defined trim box, so both file-fix functions are available:
¶ Low-resolution images
The Upscale result line tells you what kind of low-resolution images were found, and a matching button is displayed:
| Upscale result | Button |
|---|---|
| Low-resolution RGB images found (code 2) | Upscale RGB images in PDF |
| Low-resolution CMYK images found (code 3) | Upscale CMYK images in PDF |
| Low-resolution RGB and CMYK images found (code 4) | Upscale RGB and CMYK images in PDF |
¶ Missing bleed & trim box
If the analysis finds pages that don't contain a correctly defined trim box, the Bleed/trim result line says Pages do not contain a correctly defined trim box. and the Add bleed & trim box button is displayed.
¶ Step 2: Run a fix
Click the button for the fix you want to run. Processing can take up to a minute or so for large files. When the fix is complete, a link to the fixed PDF is displayed, followed by a Replace original artwork file link.
Click the link to the fixed PDF to download it and check it before you use it.
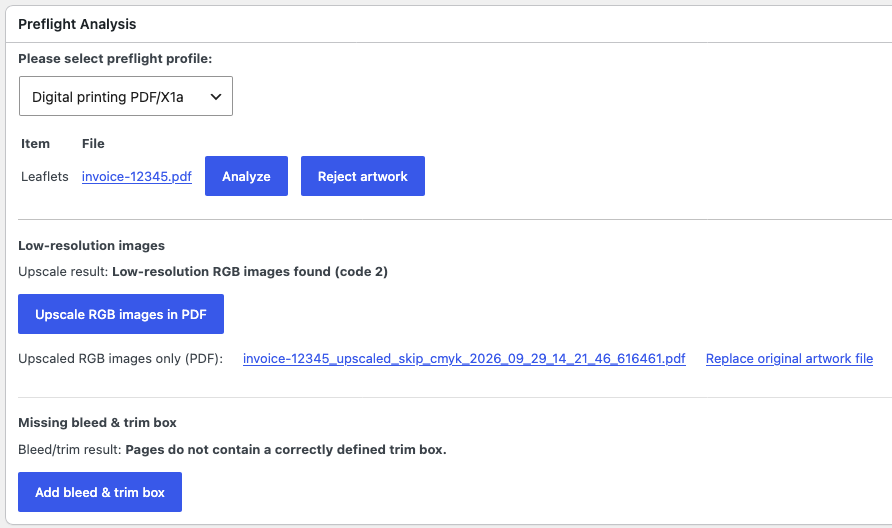
A warning is displayed with the result if you should check the fixed file carefully. For example, a warning is displayed when the pages of the PDF have different trim box or crop box sizes, so the fixed pages may not all be the same size.
¶ Step 3: Replace the original artwork file
If you are happy with the fixed file, click Replace original artwork file. The fixed file replaces the original artwork file in the order, and the page reloads. The fixed file is then used everywhere the order's artwork file is used.
The original file is not deleted. It is kept with the order's previous file versions, so you can go back to it if you need to.
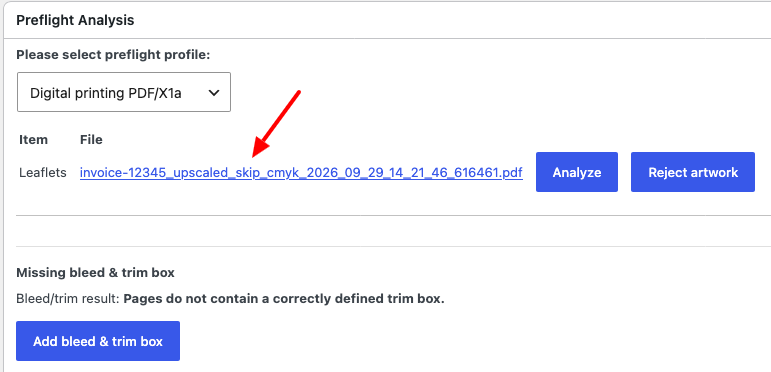
After the page reloads, the File column shows the name of the fixed file in place of the original filename. This shows you that the order now uses the fixed file. In the example below, the red arrow points to the upscaled file, invoice-12345_upscaled_skip_cmyk_….pdf, which has replaced the original invoice-12345.pdf. The fixed file was then analyzed again. Because its images are no longer low resolution, the Low-resolution images section is not displayed.
¶ Running more than one fix
File-fix functions can be chained, so a file can get several fixes one after the other. To do this, replace the original with the first fixed file, click Analyze again, and then run the next fix. Each fix is applied to the current artwork file, so the second fix builds on the result of the first.
In the example below, the upscaled file from Step 3 was analyzed again. The low-resolution images problem is gone, but the pages still have no trim box. Clicking Add bleed & trim box creates a new file that has both fixes:
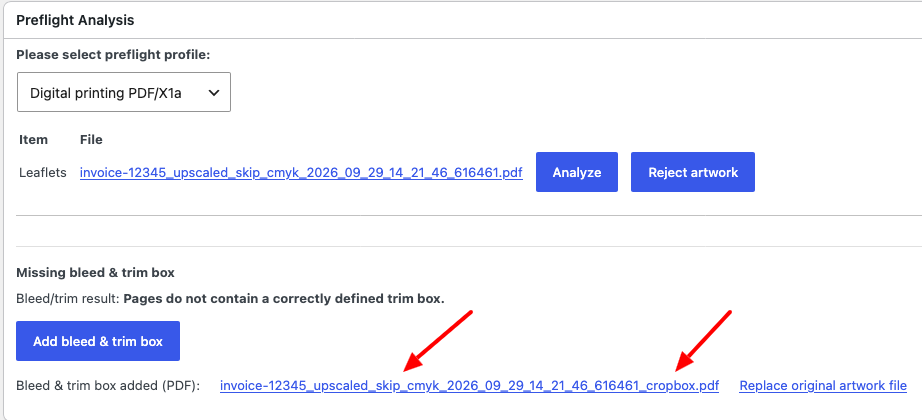
Each fix adds its own text to the filename, so you can tell from the filename which fixes have been applied. In the example above, the 2 red arrows point to the 2 changes made to the original name invoice-12345.pdf:
- _upscaled_skip_cmyk_2026_09_29_14_21_46_616461 was added by the first fix, upscaling. It includes the date and time the file was upscaled.
- _cropbox was added at the end by the second fix, adding the bleed and trim box.
Click Replace original artwork file again to use the file with both fixes in the order.
If you run a fix without clicking Replace original artwork file, the order keeps its current artwork file. You can run a fix as often as you like to review the result before deciding.